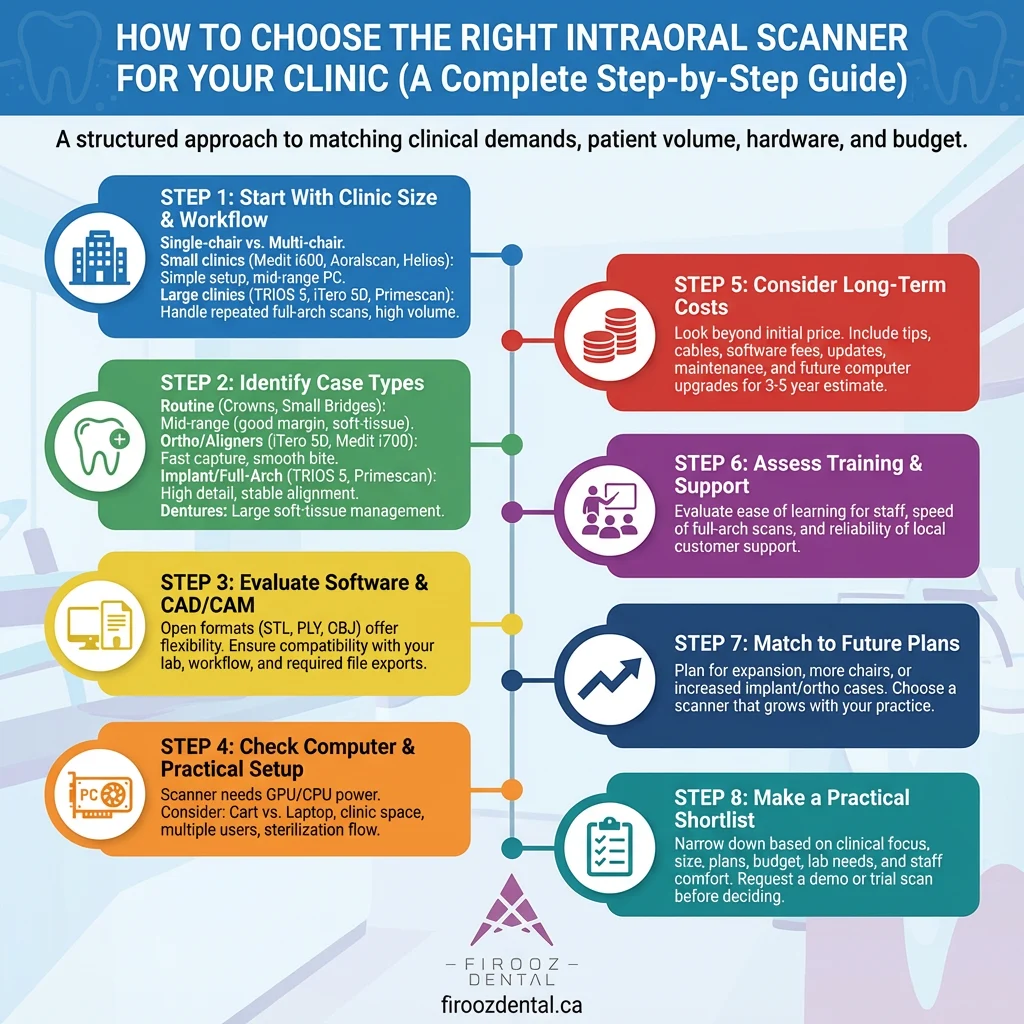
Selecting an intraoral scanner is not a simple “pick a model” decision. Each clinic has different clinical demands, patient volume, hardware conditions, and budget limits. The goal is to find a scanner that matches the way the practice truly works, not just the one that looks attractive on paper. The step-by-step approach below helps clinicians make a clear and confident decision.
here is a summary of following content:
The first factor that shapes your choice is the scale of the practice.
A single-chair clinic has a completely different rhythm compared with a busy multi-chair environment.
If your clinic is small and works with one chair, look for a scanner that is straightforward to set up, requires minimal hardware, and does not burden the team with complex configuration. These clinics often benefit from scanners such as the Medit i600, Aoralscan 3D, or Helios 600. They fit well because they can be connected quickly, run smoothly on mid-range computers, and provide dependable scans for most restorative and orthodontic tasks.
In larger clinics that manage several rooms at once, the needs are different. Here, the scanner should handle repeated full-arch scans throughout the day without slowing down or producing inconsistent results. Models such as TRIOS 5, iTero Element 5D, and Primescan are better suited for such environments. These devices maintain steady performance even during long appointments, which makes them suitable for practices with a heavy schedule.
The second stage is understanding the clinical focus of the practice.
Not all scanners perform equally across all treatments.
If your daily work includes crowns, small bridges, and routine diagnostics, mid-range scanners often provide everything you need. They capture margin lines well, handle soft-tissue areas reliably, and make everyday work more predictable.
For clinics managing orthodontic cases, especially those involving clear aligners, the scanner must capture both arches quickly and align the bite without effort. Devices with fast image capture and smooth bite registration make orthodontic visits easier. iTero Element 5D and Medit i700 are commonly selected for this reason.
Clinics handling full-arch or implant-based prosthetics require a scanner that maintains detail even in challenging areas such as deep margins or reflective surfaces. TRIOS 5 and Primescan are frequently chosen in such cases, as they hold alignment better during long scans and help avoid the need for rescanning large sections.
For complete denture records, the scanner needs to manage larger soft-tissue surfaces. Certain models handle this more comfortably, allowing the clinician to capture preliminary shapes and borders with fewer interruptions.
The scanner must work smoothly with your preferred laboratory or in-house CAD/CAM system.
Open file formats such as STL, PLY, and OBJ give more flexibility and help avoid workflow limits.
Ask yourself:
Clinics that want maximum flexibility often choose scanners with open formats and uncomplicated export settings. Others, especially those heavily involved in aligner treatments, may prefer systems that follow specific submission platforms.
A scanner is only as good as the computer supporting it.
Before purchasing, confirm that your computer or laptop meets the GPU and CPU requirements of the scanner. Premium units usually need a strong graphics card, while mid-range and budget models operate well on simpler systems.
Also consider:
This prevents unexpected costs or delays during installation.
The purchase price is only part of the equation.
You should also account for:
Some scanners cost more at the start but have lower long-term expenses. Others may appear affordable but require additional items that add to the total cost over time. A clear 3–5 year cost estimate helps avoid surprises.
Even the best scanner performs poorly if the team struggles to use it.
Evaluate how easy the system is to learn, how quickly your staff can scan a full arch, and how reliable customer support is in your region.
Try to answer:
Choosing a scanner that your team feels comfortable with saves time and reduces remakes.
Think beyond your current situation.
If you plan to expand your clinic, add more chairs, or increase your number of implant or orthodontic cases, choose a scanner that will still serve you well in the next few years. This helps avoid another purchase too soon.
Small clinics planning to grow may select mid-range models that can later handle more demanding cases. Specialists may choose systems built for advanced prosthodontic or orthodontic workloads to stay consistent as their case volume increases.
After reviewing the steps above, you should be able to narrow your options to one or two scanners that match:
At this point, requesting a demo or a trial scan on an actual patient helps you confirm the feel and performance of the scanner before making the final decision.
Choosing the right category of intraoral scanner depends on the clinical workload, the level of accuracy required, the budget, and the type of restorative or orthodontic cases handled in the practice. Below is an overview of the three main segments on the market, along with practical notes to help clinicians understand how each group fits different treatment needs.

| Category | Typical Models | Best Use Cases |
| Premium (High Accuracy) | TRIOS 5, iTero 5D, Primescan | Implant impressions, multi-unit restorations, demanding crown/bridge work, high-volume clinics |
| Mid-Range (Balanced Performance) | Medit i700 / i600, Planmeca Emerald S | General restorative dentistry, single crowns, small bridges, orthodontic scans |
| Entry-Level (Economic) | Aoralscan, Alliedstar AS series, Eighteeth Helios | New digital users, budget-friendly practices, basic crown/bridge and orthodontic needs |
These scanners provide high-quality results at a lower cost than premium models. They are widely used in general dentistry and offer strong performance for everyday crowns, bridges, aligner submissions, and diagnostic scans.
Common Models
Suitable For
Models in this group are designed for practices that need the highest level of precision and consistency, especially for implant cases, multi-unit bridges, and demanding restorative workflows. These devices usually provide fast capture, refined detail reproduction, and more advanced optical systems.
Common Models
Suitable For
These scanners are designed for new digital users or clinics looking for a lower initial investment while still gaining the benefits of digital impressions. They provide solid performance for basic restorative and orthodontic work.
Common Models
Suitable For
Selecting the right intraoral scanner depends on technical accuracy, speed, file compatibility, computer requirements, and the long-term cost of ownership. The table below summarizes key technical factors that dentists evaluate when comparing different models.
Notes for Clinicians
Accuracy Range:
Premium scanners are suitable for implants and multi-unit prosthetics where exact margin detail is required.
Speed Differences:
Faster capture is important for patients with limited tolerance and for high-volume clinics.
Tip Size Impact:
Smaller tips help when scanning second molars, subgingival areas, and patients with restricted opening.
Hardware Needs:
Stronger computers reduce lag and deliver smoother scanning.
| Specification | Premium Scanners (TRIOS 5, iTero 5D, Primescan) | Mid-Range (Medit i700/i600, Emerald S) | Entry-Level (Aoralscan, Alliedstar, Helios) |
| Accuracy (μm) | 5–12 μm | 10–20 μm | 20–40 μm |
| Scan Speed | Full arch in ~25–35 sec | Full arch in ~35–50 sec | Full arch in ~50–90 sec |
| Frame Rate (FPS) | 30–55 FPS | 25–40 FPS | 15–25 FPS |
| Tip Size | Slim, improved access | Medium | Larger than mid-range |
| Wired / Wireless | Some models wireless | Mostly wired | Wired |
| Device Weight | 140–240 g | 180–260 g | 220–350 g |
| CAD/CAM Compatibility | Broad | Broad | Varies by model |
| Output Formats | STL, PLY, OBJ | STL, PLY, OBJ | STL (some PLY) |
| PC Requirements | High GPU + strong CPU | Medium GPU | Basic GPU |
| Software License Cost | Medium to high | Low to medium | Low |
| Price Level | High | Medium | Low |
Each clinical discipline places different demands on an intraoral scanner. The sections below provide clear, practical guidance based on day-to-day use in implantology, prosthodontics, orthodontics, and full denture work, plus an option for clinics looking for a low-cost system.

Implant scanning requires high accuracy, stable image stitching, and strong detail on soft tissue and implant positions.
Recommended Models
Why These Models Fit Implant Cases
For crown and bridge work, the scanner must capture margin lines clearly and maintain consistent detail across the full preparation.
Recommended Models
What Matters Most for These Cases
Orthodontic scans require quick arch capture, clean alignment of upper and lower arches, and clear visualization of occlusion.
Recommended Models
Useful Features for Orthodontics
Scanning for complete dentures requires good data collection in large soft-tissue areas, stable capture in edentulous regions, and careful handling of movable mucosa.
Recommended Models
Key Considerations
Clinics looking to enter digital dentistry with a smaller budget can still achieve dependable results for daily restorative and orthodontic work.
Recommended Models
Why These Fit Low-Budget Clinics

Understanding the full cost of an intraoral scanner helps clinics avoid unexpected expenses after the purchase. The total cost involves the device itself, software, consumables, and the computer required to run the system smoothly. Below is a clear breakdown to help clinicians form a realistic budget.
The price of the device varies widely depending on the accuracy level, speed, hardware design, and brand.
Typical price ranges appear in the table below.
Some scanners include the main software at no additional charge, while others require an annual fee for updates, cloud storage, workflow tools, or specific submission platforms.
Clinics should confirm:
Software costs are part of the long-term investment and should be compared carefully.
Intraoral scanners use removable tips for hygiene and sterilization. Each tip has a limited number of cycles.
Additional costs include:
These recurring expenses can differ significantly across brands.
A scanner relies heavily on the computer.
Premium models often require:
Mid-range and entry-level models work smoothly on more modest hardware. Clinics should review:
A suitable computer prevents lag and irregular stitching.
Below is a general reference table for clinics preparing a budget.
Approximate Cost Table
| Category | Typical Device Price | Software / License | Annual Consumables | Suggested Clinic Type |
| Economic | Low | Low | Low to medium | Small clinics, beginners |
| Mid-Range | Medium | Low to medium | Medium | General dentists, orthodontic use |
| Premium | High | Medium to high | Medium | Specialists, large clinics, implant work |
if you want to know more about intraoral scanners, don’t miss this video:
Before investing in an intraoral scanner, every clinic should have clear answers to a few essential questions. These questions help avoid mismatches between expectations and daily reality.
A wired scanner usually offers steady data transfer and is easier to maintain.
A wireless device allows more freedom of movement but may require battery management.
The choice depends on the clinic layout and operator preference.
Clinics focusing on implants or complex bridges need higher accuracy.
General practices providing single crowns or orthodontic scans can work comfortably with mid-range options.
Accuracy should match the complexity of the treatments you provide.
Not all scanners handle deep margins or reflective surfaces equally.
Implant work requires:
Most modern scanners operate without powder.
However, if a model still needs powder in certain cases, the clinic should consider patient comfort and chairside time.
Clinics working with multiple labs should choose scanners that export open formats.
If your workflow relies on a single lab with a specific system, the requirements may differ.
Compatibility ensures smoother case handling and fewer communication issues.