Using an intraoral scanner correctly is not about moving the wand around the mouth; it is about capturing clean, complete, lab-ready data.
A good scan starts with a clean scanner tip, dry field, visible margins, steady scan path, and accurate bite registration.
In this guide, you’ll learn how to use an intraoral scanner step by step, from patient preparation to file export for CAD/CAM or the dental lab.
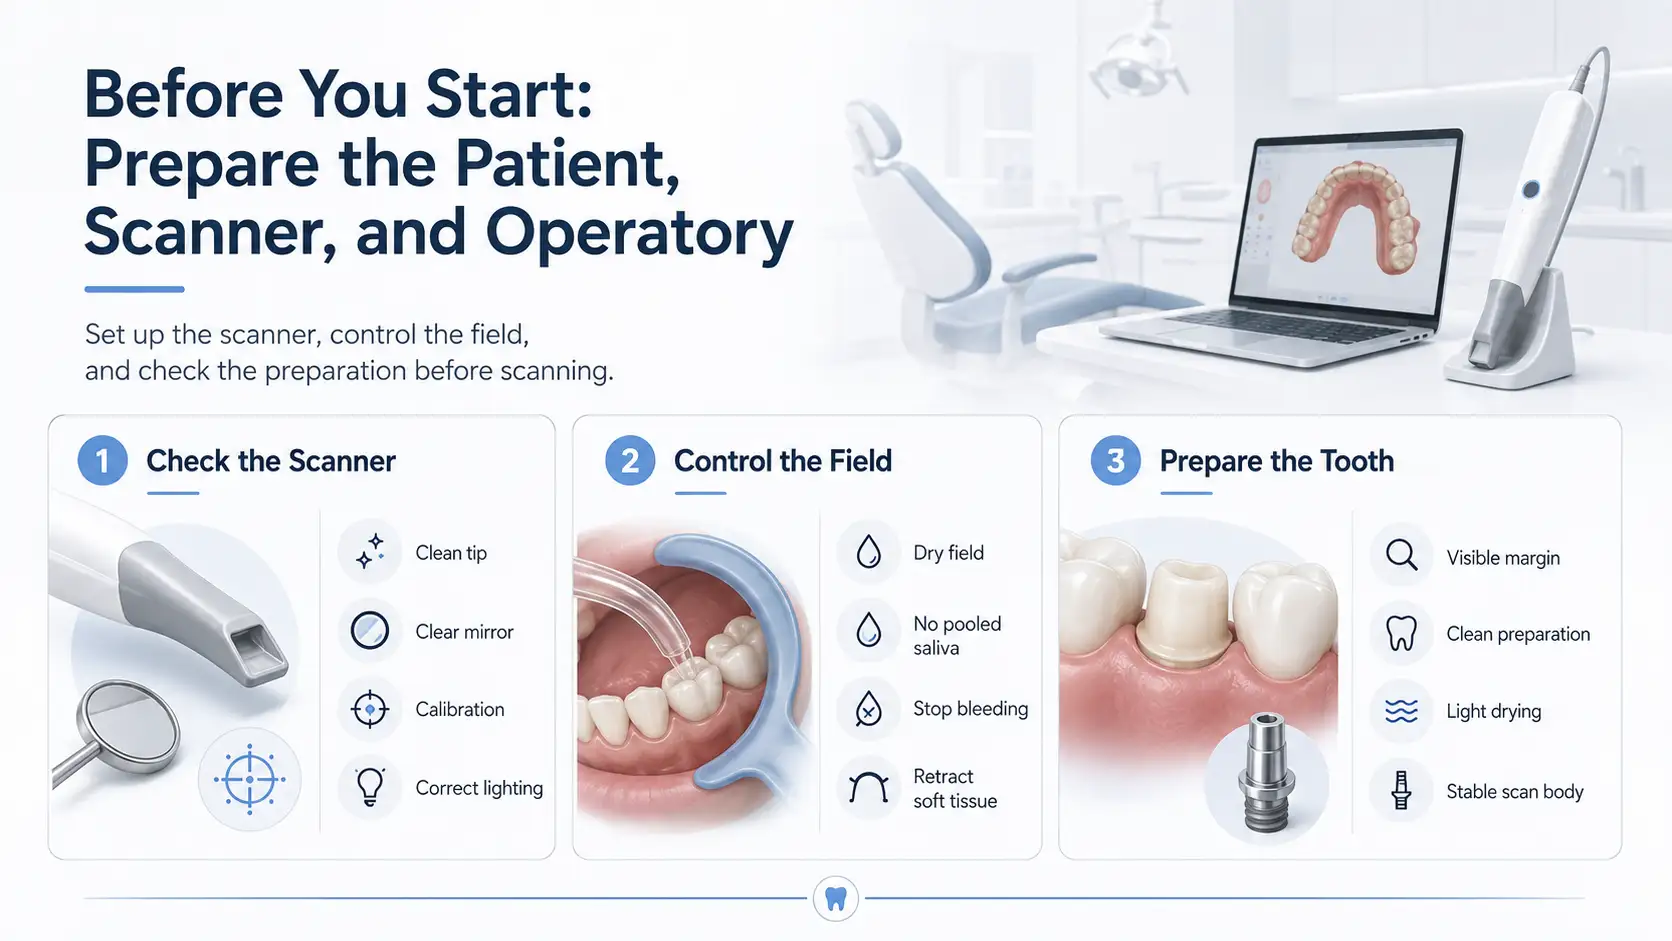
Before You Start: Prepare the Patient, Scanner, and Operatory
A good intraoral scan starts before the scanner enters the mouth. Most scan problems come from simple issues: a dirty tip, saliva on the teeth, bleeding around the margin, moving soft tissue, or a scan body that is not seated correctly.
Check the Scanner Tip, Mirror, and Calibration
Before scanning, inspect the scanner tip and mirror. Any stain, fog, scratch, water mark, or debris can reduce scan quality.
Check these first:
- The scanner tip is clean and fully attached.
- The mirror or lens is clear.
- The scanner is calibrated if the system requires it.
- The tip has been cleaned or sterilized according to the manufacturer’s instructions.
- The operatory light is not shining directly into the scan field.
Control Saliva, Blood, and Soft Tissue
For cleaner scans, keep the field dry but not over-dried. Use suction, air, cotton rolls, dry angles, cheek retractors, or isolation tools when needed.
For good saliva control and blood control:
- Remove pooled saliva before scanning.
- Stop bleeding before capturing the margin.
- Keep the tongue, cheek, and lips away from the scan area.
- Rescan any area covered by saliva, blood, or soft tissue.
Prepare the Tooth, Margin, and Gingiva
The scanner can only capture what it can see. If the margin is hidden under blood, saliva, or gingiva, the digital model will be incomplete.
Before scanning a prepared tooth:
- Make sure the tooth preparation is clean.
- Check that the margin is visible.
- Use soft tissue retraction when the margin is subgingival.
- Dry the area lightly before margin capture.
- For implant cases, confirm the scan body is fully seated and stable.
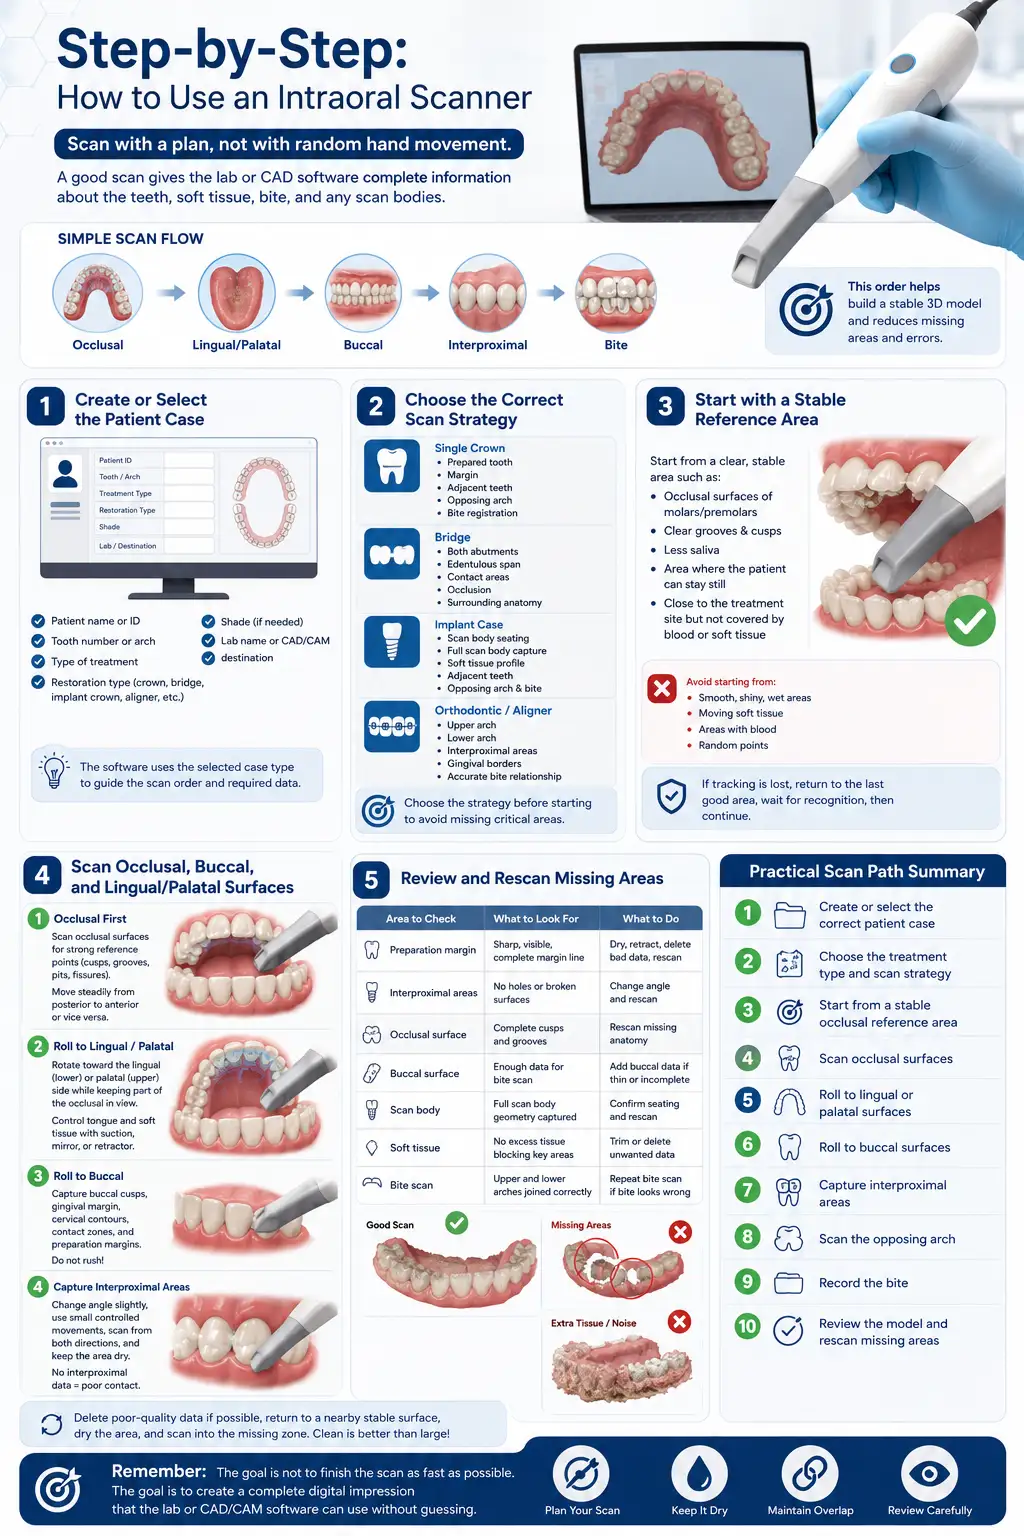
Learning how to use intraoral scanner correctly starts with one rule: scan with a plan, not with random hand movement. A good scan should give the lab or CAD software complete information about the teeth, soft tissue, bite, preparation margins, and any scan bodies used in the case.
A comprehensive Video of How to Use an Intraoral Scanner:
A simple scan flow looks like this:
Occlusal → Lingual/Palatal → Buccal → Interproximal → Bite
This order helps the software build a stable 3D model and reduces missing areas, scan holes, and stitching errors.
Step 1 – Create or Select the Patient Case
Start inside the scanner software. Before placing the scanner in the mouth, create a new case or open the correct patient file.
Add the basic case information:
- Patient name or ID
- Tooth number or arch
- Type of treatment
- Shade, if needed
- Lab name or CAD/CAM destination
- Restoration type: crown, bridge, implant crown, aligner, night guard, inlay, onlay, or diagnostic scan
This step matters because the software uses the selected case type to guide the scan order and required data. A crown case may need preparation, opposing arch, and bite. An implant case may also need a scan body. An orthodontic case usually needs a complete upper arch, lower arch, and bite registration.
Before scanning, confirm that the selected tooth, arch, and treatment plan are correct. A good scan in the wrong case file still creates problems later.
Step 2 – Choose the Correct Scan Strategy
The intraoral scanner workflow changes based on the case. Do not use the same approach for every patient.
For a single crown, focus on:
- The prepared tooth
- The margin
- Adjacent teeth
- Opposing arch
- Bite registration
For a bridge, focus on:
- Both abutments
- The edentulous span
- Contact areas
- Occlusion
- Enough surrounding anatomy for stable design
For an implant case, focus on:
- Correct scan body seating
- Full scan body capture
- Soft tissue profile
- Adjacent teeth
- Opposing arch and bite
For orthodontic or aligner scans, focus on:
- Complete upper arch
- Complete lower arch
- Interproximal areas
- Gingival borders
- Accurate bite relationship
Choose the scan strategy before starting. If you begin without a plan, you may over-scan some areas and miss the parts that actually matter.
Step 3 – Start with a Stable Reference Area
Begin the scan from an area with clear anatomy. The scanner software needs stable visual references to build the 3D model.
Good starting points are:
- Occlusal surfaces of molars and premolars
- Teeth with clear grooves and cusps
- Areas with less saliva
- Areas where the patient can stay still
- A section close to the treatment site, but not covered by blood or soft tissue
Avoid starting from smooth, shiny, wet, or moving areas. These make it harder for the software to track the scan.
Hold the scanner tip close to the teeth without touching them. Move slowly enough for the software to read the surface. If tracking is lost, do not wave the scanner around. Go back to the last area that scanned correctly, wait for the software to recognize it, then continue.
This is one of the most important intraoral scanner techniques: always recover from a known area, not from a random point.
Step 4 – Scan Occlusal, Buccal, and Lingual/Palatal Surfaces
Once the software is tracking well, follow a consistent scan path.
- Scan the Occlusal Surface First
Start with the occlusal surfaces because cusps, grooves, pits, and fissures give the software strong reference points.
Move from posterior to anterior, or anterior to posterior, depending on the scanner’s recommended protocol. Keep the motion steady and avoid jumping from one side of the arch to the other.
While scanning the occlusal surface, check the screen often. The model should appear complete, without large holes or broken surfaces.
- Roll Toward the Lingual or Palatal Side
After the occlusal scan, rotate the scanner slightly toward the lingual side in the lower arch or the palatal side in the upper arch.
Keep part of the already-scanned occlusal surface in view. This overlap helps the software connect the new surface to the existing model.
For the lower arch, control the tongue with suction, a mirror, or a retractor. For the upper arch, pay attention to the palatal surfaces and posterior areas, where access can be more difficult.
- Roll Toward the Buccal Side
Next, return to the occlusal surface and roll the scanner toward the buccal side.
Capture:
- Buccal cusps
- Gingival margin area
- Cervical contours
- Contact zones
- Preparation margins, if present
Do not rush the buccal scan. This area is often needed for bite registration, contact evaluation, and restoration design.
- Capture Interproximal Areas Carefully
Interproximal areas are easy to miss, especially between crowded teeth or near tight contacts.
To scan these areas better:
- Change the scanner angle slightly
- Use small controlled movements
- Scan from both buccal and lingual/palatal directions
- Keep the area dry
- Remove soft tissue or saliva from the scan field
If interproximal data is missing, the restoration may have poor contact or an inaccurate shape.
Step 5 – Review and Rescan Missing Areas
Do not finish the scan as soon as the arch “looks complete.” Rotate the 3D model on the screen and inspect it from different angles.
Check these areas before moving on:
| Area to Check | What to Look For | What to Do |
| Preparation margin | Sharp, visible, complete margin line | Dry, retract, delete bad data, rescan |
| Interproximal areas | No holes or broken surfaces | Change angle and rescan |
| Occlusal surface | Complete cusps and grooves | Rescan missing anatomy |
| Buccal surface | Enough data for bite scan | Add buccal data if thin or incomplete |
| Scan body | Full scan body geometry captured | Confirm seating and rescan |
| Soft tissue | No excess tissue blocking key areas | Trim or delete unwanted data |
| Bite scan | Upper and lower arches joined correctly | Repeat bite scan if bite looks wrong |
If you see missing areas, fix them before sending the file. A small scan hole near a non-critical soft tissue area may not matter, but missing data on a margin, contact, scan body, or bite area can affect the final restoration.
When rescanning, delete the poor-quality area first if the software allows it. Then dry the area, return to a nearby stable surface, and scan into the missing zone. Do not keep adding layers of messy data over the same area.
A clean scan is usually better than a large scan full of extra tissue, blurred surfaces, and repeated passes.
Practical Scan Path Summary
Use this simple order for most routine cases:
- Create or select the correct patient case
- Choose the treatment type and scan strategy
- Start from a stable occlusal reference area
- Scan occlusal surfaces
- Roll to lingual or palatal surfaces
- Roll to buccal surfaces
- Capture interproximal areas
- Scan the opposing arch
- Record the bite
- Review the model and rescan missing areas
The goal is not to finish the scan as fast as possible. The goal is to create a complete digital impression that the lab or CAD/CAM software can use without guessing.
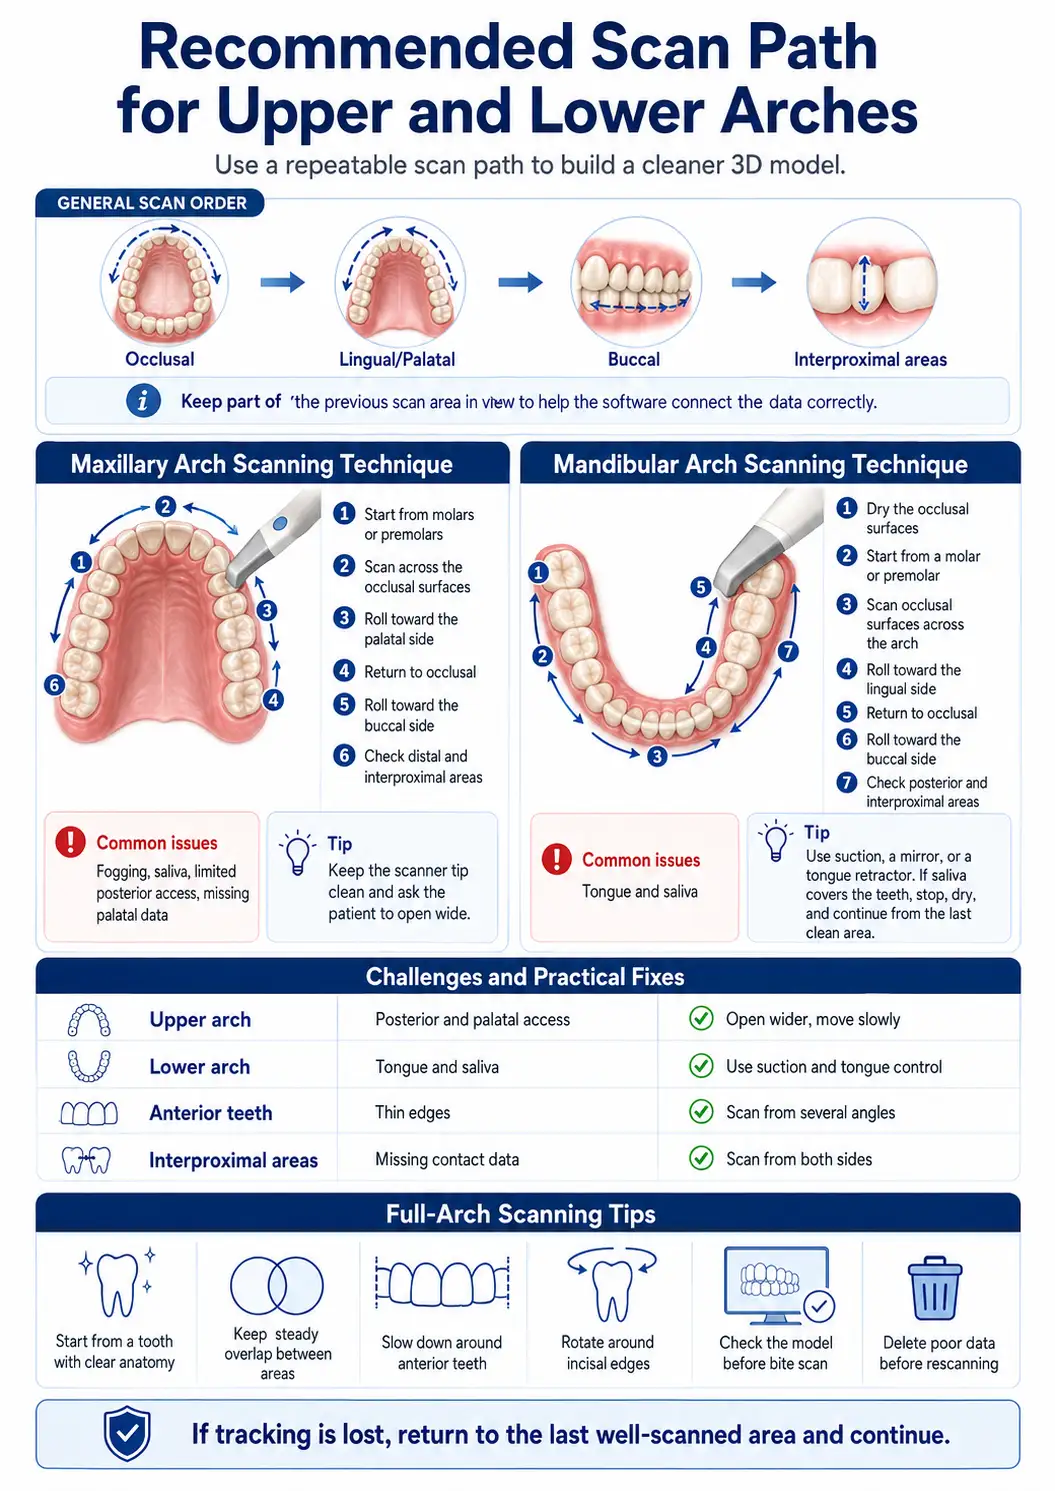
Recommended Scan Path for Upper and Lower Arches
A repeatable scan path helps the software build a cleaner 3D model. For most cases, use this order:
Occlusal → Lingual/Palatal → Buccal → Interproximal areas
Keep part of the previous scan area in view while moving to the next surface. This helps the software connect the data correctly.
Maxillary Arch Scanning Technique
For a maxilla scan, start from the posterior occlusal surface, where cusps and grooves are easy to capture.
Use this path:
- Start from molars or premolars.
- Scan across the occlusal surfaces.
- Roll toward the palatal side.
- Return to occlusal.
- Roll toward the buccal side.
- Check distal and interproximal areas.
In the upper arch, the main problems are fogging, saliva, limited posterior access, and missing palatal data. Keep the scanner tip clean and ask the patient to open wide enough for access.
Mandibular Arch Scanning Technique
For a mandible scan, control the tongue and saliva first. The lower arch is harder because pooled saliva and tongue movement can block the scan field.
Use this path:
- Dry the occlusal surfaces.
- Start from a molar or premolar.
- Scan occlusal surfaces across the arch.
- Roll toward the lingual side.
- Return to occlusal.
- Roll toward the buccal side.
- Check posterior and interproximal areas.
Use suction, a mirror, or a tongue retractor. If saliva covers the teeth, stop, dry, and continue from the last clean area.
| Area | Main Challenge | Practical Fix |
| Upper arch | Posterior and palatal access | Open wider, move slowly |
| Lower arch | Tongue and saliva | Use suction and tongue control |
| Anterior teeth | Thin edges | Scan from several angles |
| Interproximal areas | Missing contact data | Scan from both sides |
Full-Arch Scanning Tips
For a full arch scan technique, do not jump between areas. Keep one continuous path.
Use these rules:
- Start from a tooth with clear anatomy.
- Keep steady overlap between areas.
- Slow down around anterior teeth.
- Rotate around incisal edges.
- Check the model before bite scan.
- Delete poor data before rescanning.
If tracking is lost, return to the last well-scanned area and continue.
How to Capture Accurate Margins and Preparation Details
The scanner can only capture what it can see. If the preparation margin is hidden by blood, saliva, or gingiva, the digital impression will be incomplete.
Why Margin Visibility Is Non-Negotiable
A clear margin helps the dental lab or CAD designer define the finish line correctly. A blurred margin can cause poor fit, open margins, more chairside adjustment, or case remake.
Before margin capture, check that the margin is sharp, dry, continuous, and not covered by soft tissue.
If the margin is not clear in the scan, sending the file only moves the problem to the CAD design stage.
Managing Subgingival Margins
Subgingival margins need tissue control before scanning. Use retraction cord, retraction paste, hemostatic agent, suction, air drying, or soft tissue retraction when needed.
After the margin is visible and bleeding is controlled, scan the prepared tooth before the tissue collapses again.
When to Retract, Dry, Delete, and Rescan
If blood, saliva, or tissue covers the preparation, do not keep scanning over it.
Use this order:
- Stop scanning.
- Dry the area.
- Retract tissue if needed.
- Delete poor scan data.
- Return to a nearby stable tooth.
- Rescan the margin slowly.
- Rotate the model and check the finish line.
A clean local rescan is better than adding messy layers over bad data.
Intraoral Scanner Bite Registration: How to Capture Occlusion Correctly
Intraoral scanner bite registration records how the upper and lower arches meet. If the bite scan is wrong, the final restoration may feel too high, too low, or out of contact.
Prepare the Patient for Bite Scan
Before the bite scan:
- Remove cotton rolls and isolation materials.
- Ask the patient to close naturally.
- Make sure the jaw is not shifted.
- Retract the cheek.
- Dry the buccal surfaces.
Ask the patient to bite gently in their normal position. Do not ask them to bite too hard.
Scan the Buccal Bite Area
Place the scanner near the posterior buccal area before starting.
Use this method:
- Patient closes in normal bite.
- Retract the cheek.
- Start from posterior buccal teeth.
- Capture 3 to 5 teeth if possible.
- Include upper and lower buccal surfaces.
- Move slowly toward premolars or canines.
Keep the scan focused on teeth, not cheek or movable tissue.
Verify Occlusal Position Before Sending
After the occlusion scan, check that the arches meet correctly on the screen.
Look for:
- Correct upper and lower arch contact
- No unexpected open bite
- No sideways shift
- Enough buccal data
- Contacts that match the mouth
If the bite looks wrong, repeat it before sending the case.
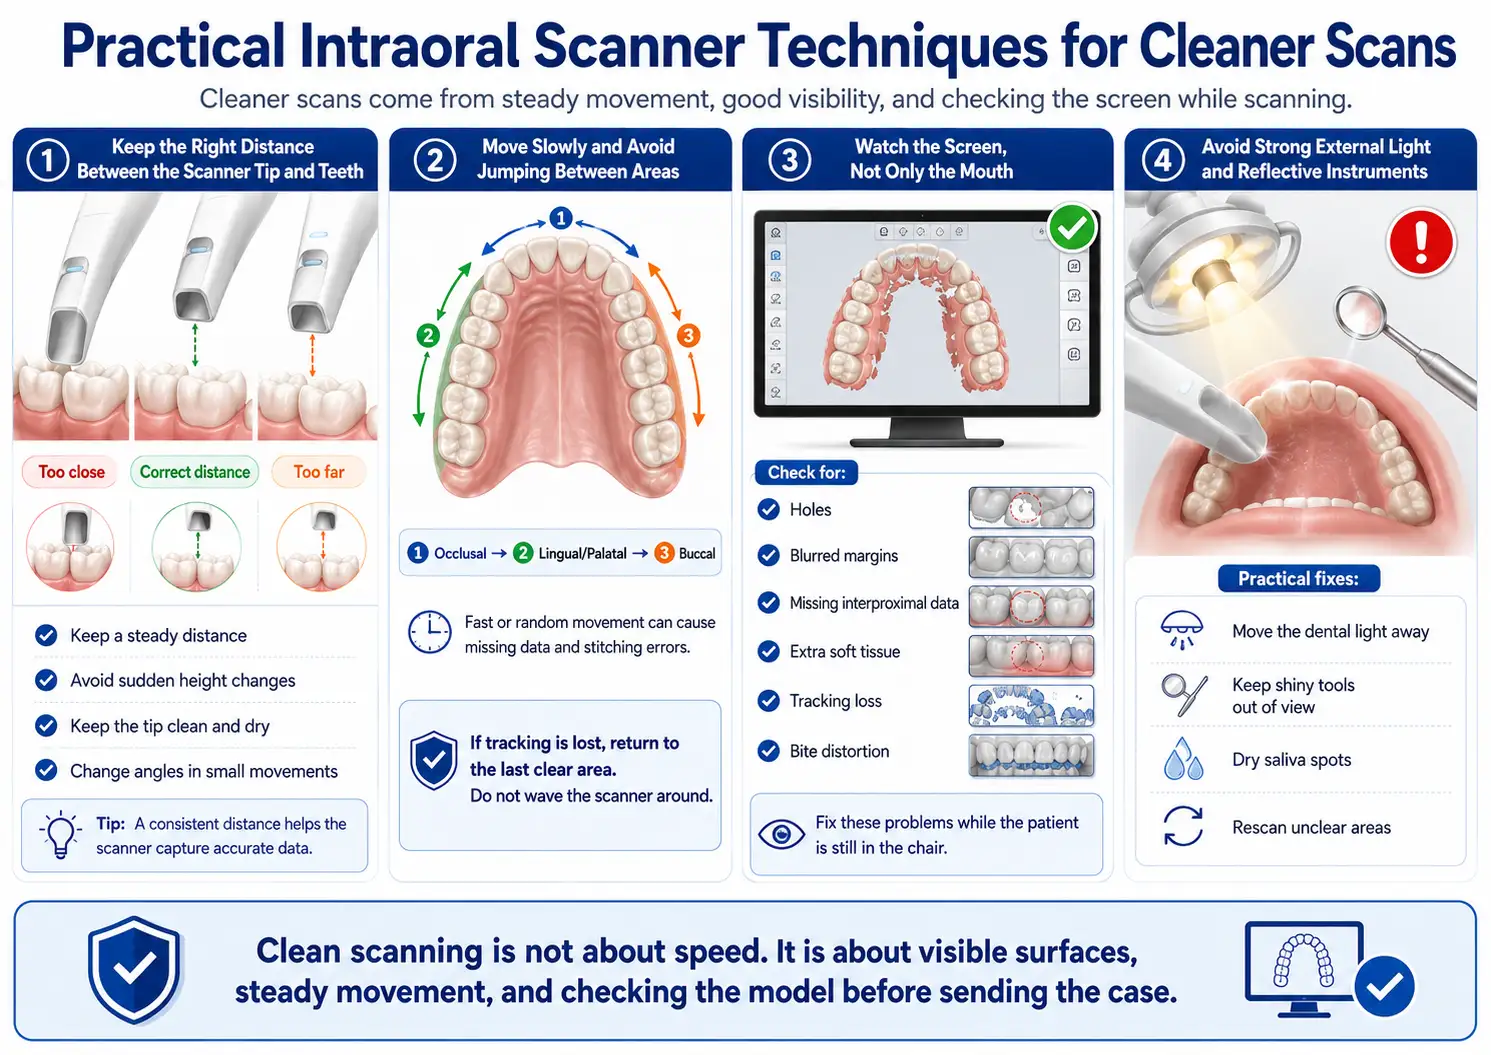
Practical Intraoral Scanner Techniques for Cleaner Scans
Cleaner scans come from steady movement, good visibility, and checking the screen while scanning.
Keep the Right Distance Between the Scanner Tip and Teeth
Keep the scanner tip close enough to read the tooth surface, but do not press it into teeth or soft tissue.
Good technique:
- Keep a steady distance.
- Avoid sudden height changes.
- Keep the tip clean and dry.
- Change angles in small movements.
Move Slowly and Avoid Jumping Between Areas
Fast or random movement can cause missing data and stitching errors.
Use a continuous path:
Occlusal → Lingual/Palatal → Buccal
If tracking is lost, return to the last clear area. Do not wave the scanner around.
Watch the Screen, Not Only the Mouth
The screen shows what the scanner actually captured.
Check for:
- Holes
- Blurred margins
- Missing interproximal data
- Extra soft tissue
- Tracking loss
- Bite distortion
Fix these problems while the patient is still in the chair.
Avoid Strong External Light and Reflective Instruments
Strong dental light, headlamps, shiny tools, or wet reflective areas can affect scan capture.
Practical fixes:
- Move the dental light away.
- Keep shiny tools out of view.
- Dry saliva spots.
- Rescan unclear areas.
Clean scanning is not about speed. It is about visible surfaces, steady movement, and checking the model before sending the case.
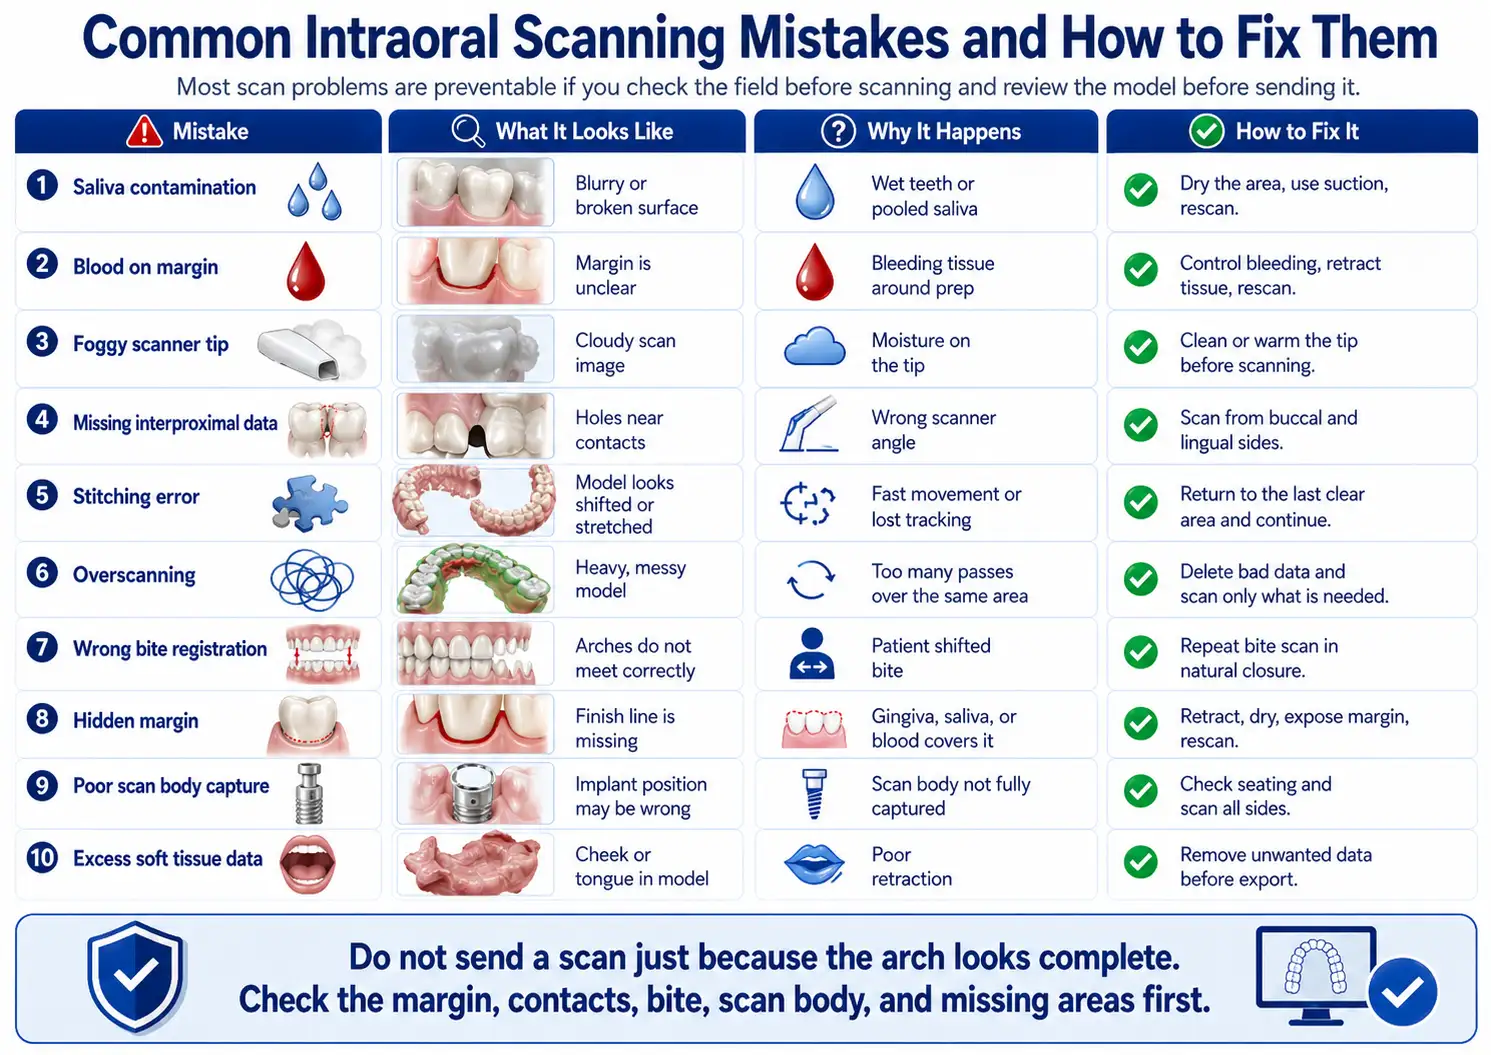
Common Intraoral Scanning Mistakes and How to Fix Them
Most scan problems are easy to prevent if you check the field before scanning and review the model before sending it.
| Mistake | What It Looks Like | Why It Happens | How to Fix It |
| Saliva contamination | Blurry or broken surface | Wet teeth or pooled saliva | Dry the area, use suction, rescan |
| Blood on margin | Margin is unclear | Bleeding tissue around prep | Control bleeding, retract tissue, rescan |
| Foggy scanner tip | Cloudy scan image | Moisture on the tip | Clean or warm the tip before scanning |
| Missing interproximal data | Holes near contacts | Wrong scanner angle | Scan from buccal and lingual sides |
| Stitching error | Model looks shifted or stretched | Fast movement or lost tracking | Return to the last clear area and continue |
| Overscanning | Heavy, messy model | Too many passes over the same area | Delete bad data and scan only what is needed |
| Wrong bite registration | Arches do not meet correctly | Patient shifted bite | Repeat bite scan in natural closure |
| Hidden margin | Finish line is missing | Gingiva, saliva, or blood covers it | Retract, dry, expose margin, rescan |
| Poor scan body capture | Implant position may be wrong | Scan body not fully captured | Check seating and scan all sides |
| Excess soft tissue data | Cheek or tongue in model | Poor retraction | Remove unwanted data before export |
Do not send a scan just because the arch looks complete. Check the margin, contacts, bite, scan body, and missing areas first.
Intraoral Scanner Workflow for Different Clinical Cases
The intraoral scanner workflow changes by case type. A crown scan is not the same as an implant or orthodontic scan.
| Case Type | Main Scanning Priority | Common Risk | Quality Check |
| Single crown | Clear margin and adjacent contacts | Blurred finish line | Check margin from all angles |
| Inlay / Onlay | Internal prep detail | Missing cavity walls | Inspect prep floor and margins |
| Bridge | Abutments and span area | Distorted contact or pontic space | Check both abutments and bite |
| Implant scan | Full scan body capture | Scan body not seated or incomplete | Verify scan body before export |
| Orthodontic scan | Full upper and lower arches | Missing interproximal data | Check arch continuity and bite |
| Full-arch scan | Continuous scan path | Stitching error | Review model shape before bite |
| Edentulous case | Soft tissue and reference areas | Poor tracking | Scan slowly and use stable landmarks |
Single Crown and Inlay/Onlay Cases
For a crown, inlay, or onlay, focus on the prepared tooth, margin, adjacent teeth, opposing arch, and bite. The margin must be sharp enough for CAD design.
Bridges and Multi-Unit Restorations
For bridges, scan both abutments carefully. Capture enough teeth around the area so the lab can design contacts, occlusion, and pontic shape correctly.
Implant Scanning with Scan Bodies
For implant cases, confirm the scan body is fully seated before scanning. Capture the top, sides, and surrounding tissue. If part of the scan body is missing, repeat the scan.
Orthodontic Scans and Simulation
For orthodontic scans, capture the full upper arch, full lower arch, gingival borders, interproximal areas, and bite. Missing contact areas can affect treatment planning.
Full-Arch and Edentulous Cases
Full-arch and edentulous scans need slower movement and more care. Since there are fewer clear landmarks, tracking errors happen more easily.
How to Check Scan Quality Before Exporting the File
Before export, rotate and zoom the model. Look at it like a lab technician would.
Inspect Margins, Contacts, Occlusion, and Soft Tissue Data
Check these areas:
- Margins are clear and complete.
- Contact areas are not missing.
- Occlusion looks like the patient’s real bite.
- Scan body is fully captured.
- No large holes exist near key areas.
- Tongue, cheek, and extra soft tissue are removed.
Delete Unwanted Data and Rescan Critical Areas
If an area is unclear, do not cover it with more scan layers. Delete the poor part, dry the area, and rescan from a nearby stable surface.
Rescan if you see:
- Blurred margin
- Broken contact area
- Incomplete scan body
- Wrong bite
- Distorted arch shape
- Missing prep detail
Confirm the Lab Has Everything Needed
Before sending, make sure the case includes:
- Prepared arch
- Opposing arch
- Bite registration
- Correct tooth number
- Restoration type
- Shade, if needed
- File format requested by the lab
- Clear notes for the technician
Exporting and Sending Intraoral Scans to the Dental Lab
After the scan passes quality check, export it in the file format your lab or CAD software needs.
STL vs PLY vs OBJ Files
| File Format | Includes Color? | Best For | Limitation |
| STL | No | Most CAD/CAM cases | No color or texture |
| PLY | Yes | Cases needing color detail | Not accepted by every system |
| OBJ | Yes | Detailed 3D models | Larger file size |
STL is the most common format. PLY and OBJ are useful when color, tissue detail, or texture helps the lab.
What Information Should You Send With the Scan?
Send the scan with clear case details:
- Patient or case ID
- Tooth number
- Restoration type
- Material choice
- Shade
- Margin notes
- Implant system, if used
- Scan body type
- Due date
- Special design notes
How Intraoral Scans Fit Into CAD/CAM Workflow
The scan becomes the digital model for CAD design. After design, the restoration can be milled, printed, or sent to the lab for production. A clean scan reduces guesswork during design.
Intraoral Scanner Sterilization and Infection Control
Intraoral scanner sterilization must follow the manufacturer’s Instructions for Use. Do not guess, and do not use the same tip between patients without proper reprocessing.
Clean and Reprocess Scanner Tips Between Patients
After each patient:
- Remove the scanner tip.
- Clean visible debris.
- Reprocess the tip as instructed.
- Let it dry fully.
- Store it in a clean area.
Some scanner tips are autoclavable. Some are not. Follow the exact IFU for your device.
Follow the Manufacturer’s Instructions for Use
The IFU tells you:
- Which parts can be sterilized
- Which disinfectants are allowed
- Autoclave temperature and cycle
- Number of allowed reuse cycles
- What not to clean with
Never autoclave scanner parts unless the manufacturer clearly says they are autoclavable.
Protect the Scanner Body Without Damaging Optics
The scanner body should be protected from spray, debris, and disinfectant damage. Wipe it only with approved materials. Do not flood the optics, cable, buttons, or vents with liquid.
Intraoral Scanner Training: How to Build Skill Faster
Intraoral scanner training should include practice, review, and feedback. Watching an intraoral scanner demo helps, but skill comes from repeated scanning.
Start With Simple Cases Before Complex Full-Arch Scans
Begin with:
- Typodont scans
- Staff member scans
- Single crown cases
- Quadrant scans
- Full-arch scans
- Implant or orthodontic cases
Do not start training with the hardest cases.
Practice a Repeatable Scan Path
Use the same scan path every time:
Occlusal → Lingual/Palatal → Buccal → Bite
A repeatable path helps the team scan faster with fewer missing areas.
Use Demo Cases to Train the Dental Team
A good intraoral scanner course should teach the dentist, assistant, and lab coordinator. Everyone should know how to create the case, scan, review the model, export files, and send notes to the lab.
When Not to Trust the Scan Immediately
Not every scan should be sent right away. Some cases need extra review or a local rescan.
Bleeding Margins and Poor Tissue Control
If the margin is covered by blood or tissue, the scan is not ready. Control the tissue first, then rescan.
Deep Subgingival Preparations
Deep margins are hard to capture. Use retraction, dry the area, scan in small sections, and check the finish line before export.
Long-Span Implant or Full-Arch Cases
Long spans can create tracking problems. Review the arch shape carefully and check scan body capture before sending.
Unstable Bite or Patient Movement
If the patient shifts during bite registration, repeat the bite scan. A bad bite record can affect the final restoration.
FAQs
- How do you use an intraoral scanner step by step?
Start by preparing the patient and drying the field, then scan the occlusal, lingual or palatal, buccal, and interproximal surfaces. After that, record the bite and review the 3D model before sending it. - What is the correct scan path for an intraoral scanner?
For most cases, use this order: occlusal first, then lingual or palatal, then buccal, and finally interproximal areas. This gives the software enough stable data to build the model. - How do I prepare a patient before intraoral scanning?
Make sure the teeth are clean, the field is dry, the cheeks and tongue are controlled, and any bleeding around the preparation margin is managed before scanning. - How close should the intraoral scanner tip be to the teeth?
Keep the scanner tip close enough to read the tooth surface clearly, but do not press it against the teeth or soft tissue. A steady distance gives a cleaner scan. - Why is my intraoral scan missing data?
Missing data usually comes from saliva, blood, fast hand movement, poor angulation, foggy scanner tips, or jumping between areas during scanning. - How do you scan preparation margins clearly?
The margin must be visible, dry, and free from blood or gingiva. Use tissue retraction when needed, delete unclear data, and rescan the margin slowly. - How do you take bite registration with an intraoral scanner?
Ask the patient to close naturally, retract the cheek, and scan the buccal surfaces of both arches. Then check that the upper and lower models meet correctly. - What should I check before sending an intraoral scan to the lab?
Check the preparation margin, contacts, occlusion, scan body, missing holes, extra soft tissue, and file format. Do not send the case only because the arch looks complete. - What file format should I export from an intraoral scanner?
STL is commonly used for many CAD/CAM cases. PLY and OBJ may be better when color or tissue detail is useful for the lab. - How should intraoral scanner tips be cleaned or sterilized?
Follow the manufacturer’s instructions for use. Some tips are autoclavable, while others need a different reprocessing method. Never sterilize scanner parts by guessing.